• Skip to primary navigation
  • Skip to main content
  • Skip to primary sidebar
Momcrieff
  • About Me
    • Contact me
  • Recipes
    • Three Ingredient Recipes
    • Appetizers
    • Main Dish
    • Salads and Dressings
    • Soups
    • Baked Items
    • Desserts & Treats
  • Air Fryer Recipes
    • Air Fryer Protein
    • Air Fryer Sides
  • Gardening
    • Spring Gardening
    • Fall Gardening
    • Gardening And Landscaping
    • Planters / Containers
    • Misc. & Chores
  • Misc.
    • My 100 year old home
    • Home Ownership
    • Vacations
      • Family Vacation
    • DIY
      • DIY
      • Valentine's Day
      • Spring
      • Fabulous Fall!
      • Christmas & Winter
  • Nav Social Menu

    • Facebook
    • Instagram
    • Pinterest
    • RSS
    • Twitter
menu icon
go to homepage
subscribe
search icon
Homepage link
  • 1923 House
  • Easy Recipes
  • Gardening
  • DIY
  • About Me
  • Subscribe
  • Privacy Policy
  • Terms and Conditions
    • Facebook
    • Instagram
    • Pinterest
  • ×
    Home » Misc. » DIY & Hints » DIY

    Upcycled Tray - Bloom Where You Are Planted.

    Published: Mar 20, 2016 · Modified: May 6, 2022 by Susan Moncrieff · This post may contain affiliate links · 7 Comments

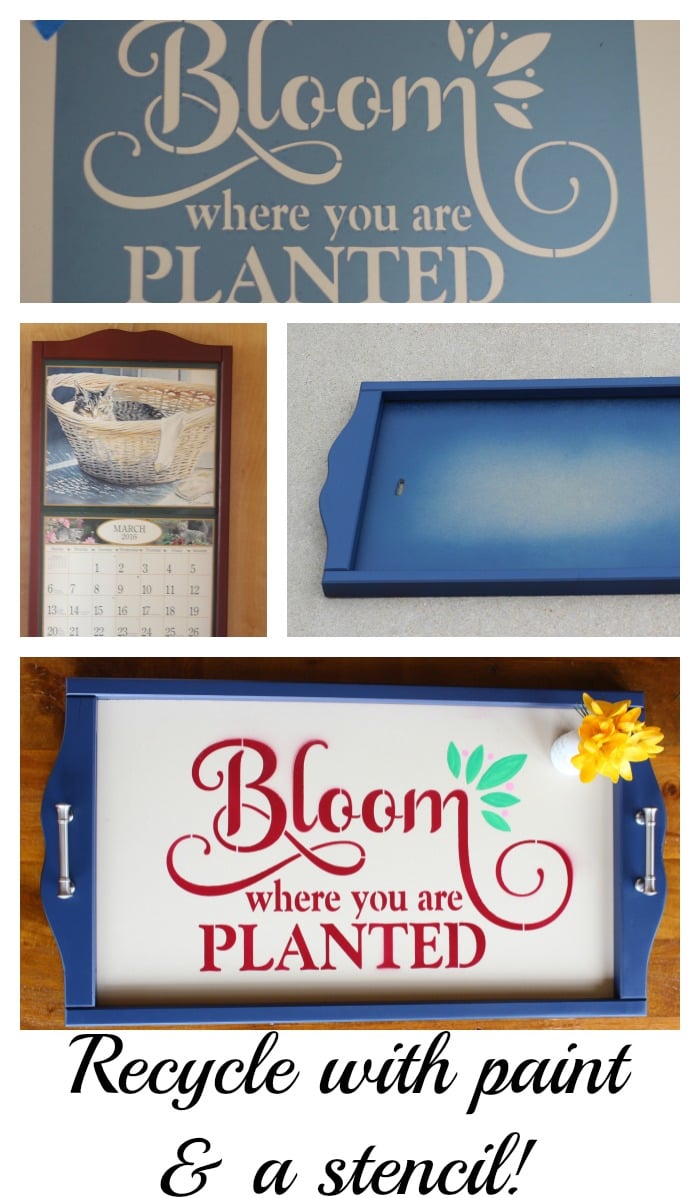
    Repurposing a calendar frame - Make a tray!

    I purchased a "Bloom Where You are Planted" stencil and really wanted to make something pretty with it. That saying just spoke to me. I was going through a difficult personal time and it just told me that no matter what is going on, you can still grow.

    Bloom Where You Are Planted stenciled on red onto a blue upcycled tray

    I had a hard time figuring out what to stencil this phrase on. I'll confess, I even called over my crafty neighbor, Amy. I showed her the one thing it fit onto, my wooden calendar frame.

    Original calendar frame with a calendar in it


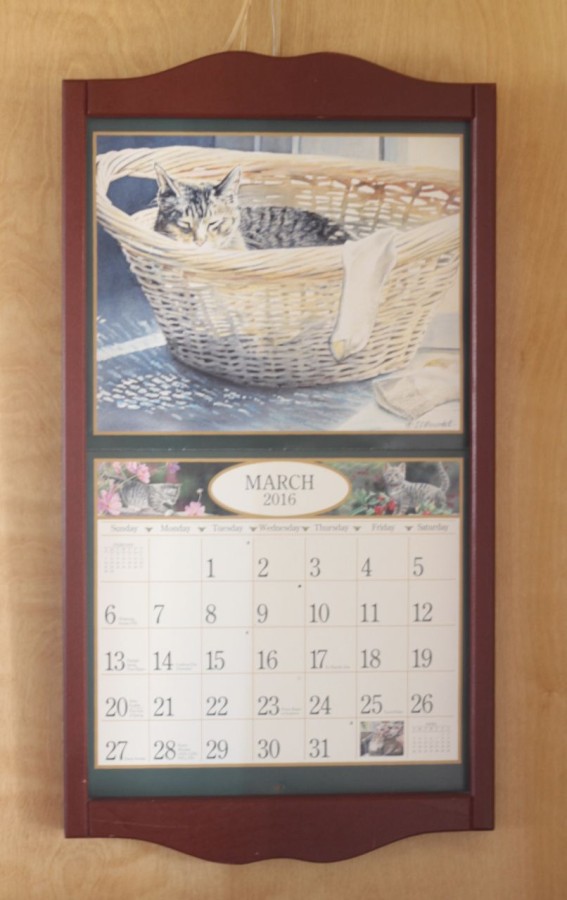
    I was commenting that I could display the framed phrase on this calendar frame but what would 'it' be?

    She looked at me quizzically. Then she told me that it was a tray! How I didn't see it initially, I don't know!

    I didn't want it to be burgundy.  I wanted it to be a pretty navy blue.

    Spray

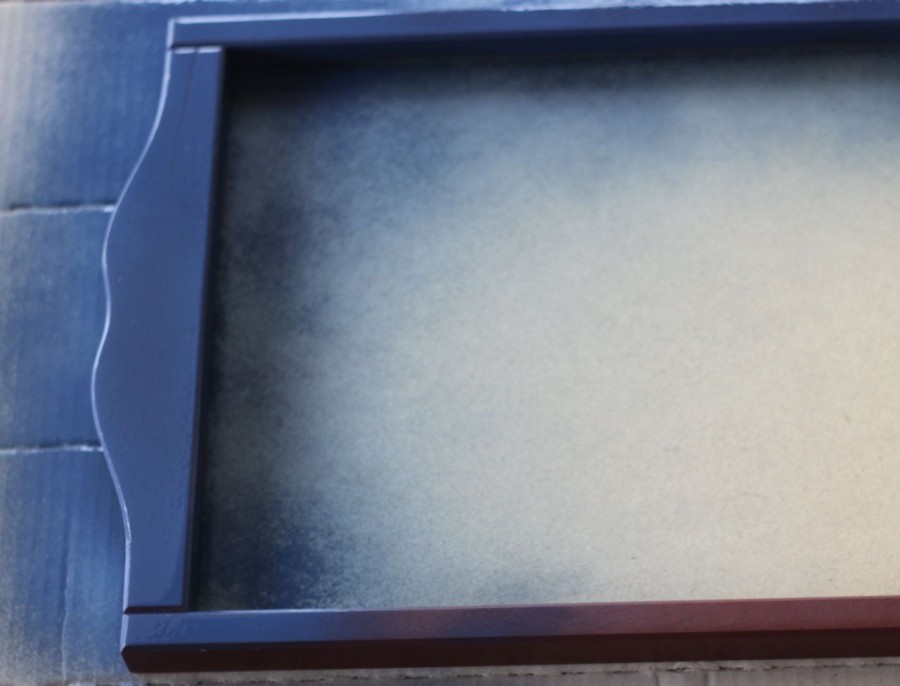
    I love transforming things with spray paint!

    So, I was wandering around Home Depot trying to find an insert.  The backboard that was on the back of this calendar frame was very rough and there was no way it would have looked good if I painted and stenciled on it.

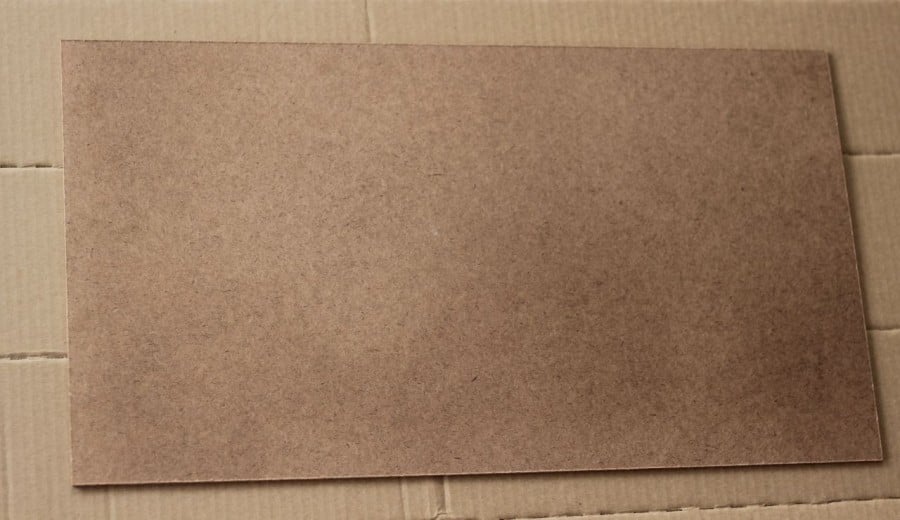
    I found inexpensive hardboard.  I love the guys that cut things for you.  And, they do it for free.  I had the exact dimensions with me and he cut the board into three perfectly sized inserts.  The original board cost less than $5.00.  Which I consider a deal since I can make three different inserts!  Below is what one of the inserts looked like.  You'll see later that I spray painted it a pretty cream color.

    A

    Below is the stencil.  I used some painter's tape to fasten it to the insert.  I also ended up taping cut up paper bags around the stencil so there wouldn't be any overspray.

    taping

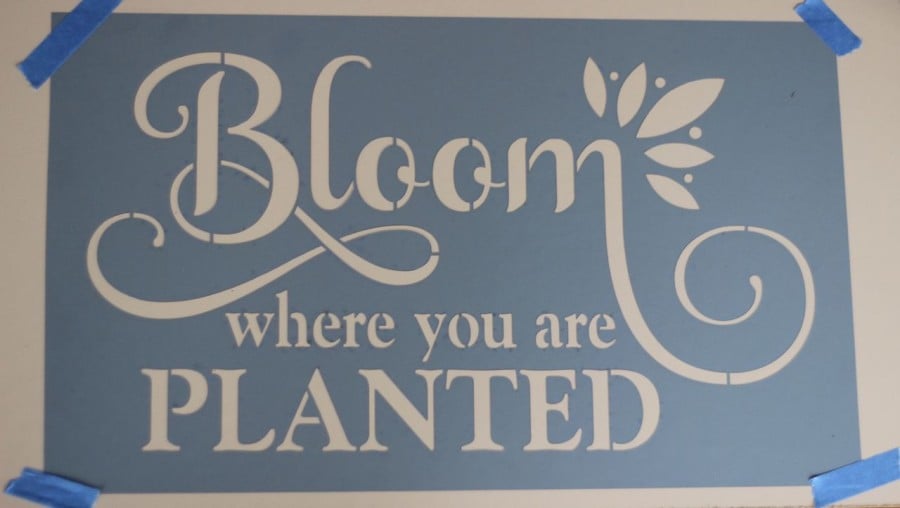
    And, I covered the little flower on the top right.  I wanted to paint those different colors.

    Bloom Where You Are Planted stencil being painted

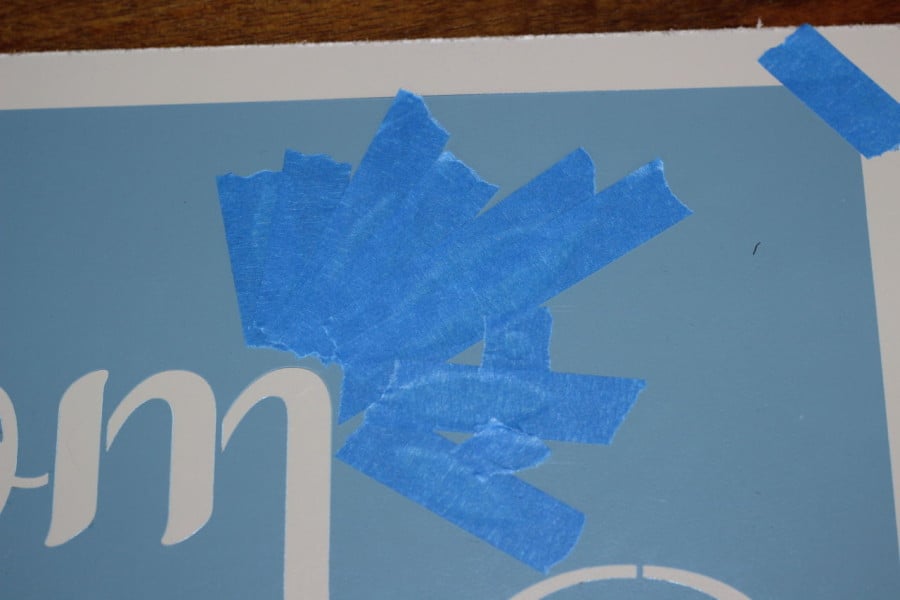
    I did use burgundy spray paint on the stencil.  I love it!  I just haven't figured out how to clean the spray paint off the stencil : (.

    Bloom Where You Are Planted

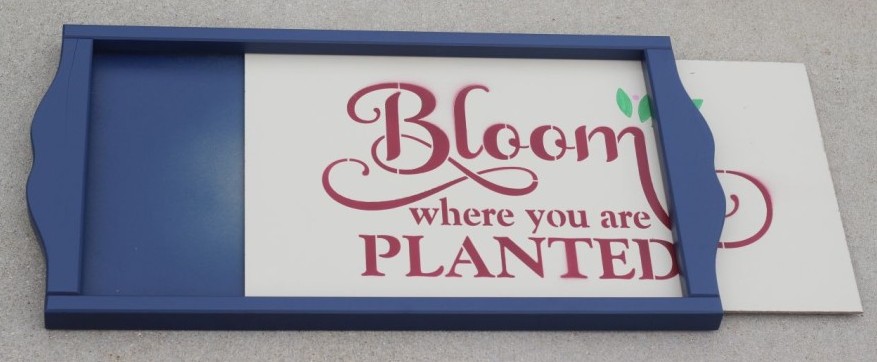
    See how I can slide the insert in.  Like I used to slide in the calendar.

    chocolate banana muffins
    FREE SIGN UP

    Looking for super easy delicious recipes? Sign up and I'll send them!

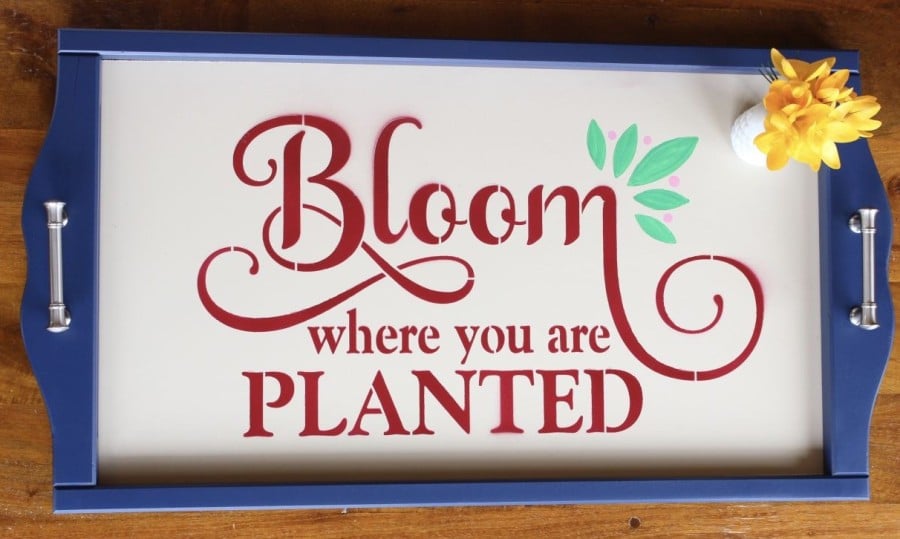
    I bought some inexpensive drawer pulls and attached them.  I love the clean look of the silver against the blue.

    Bloom Where You Are Planted tray with pretty drawer pulls as the tray handles

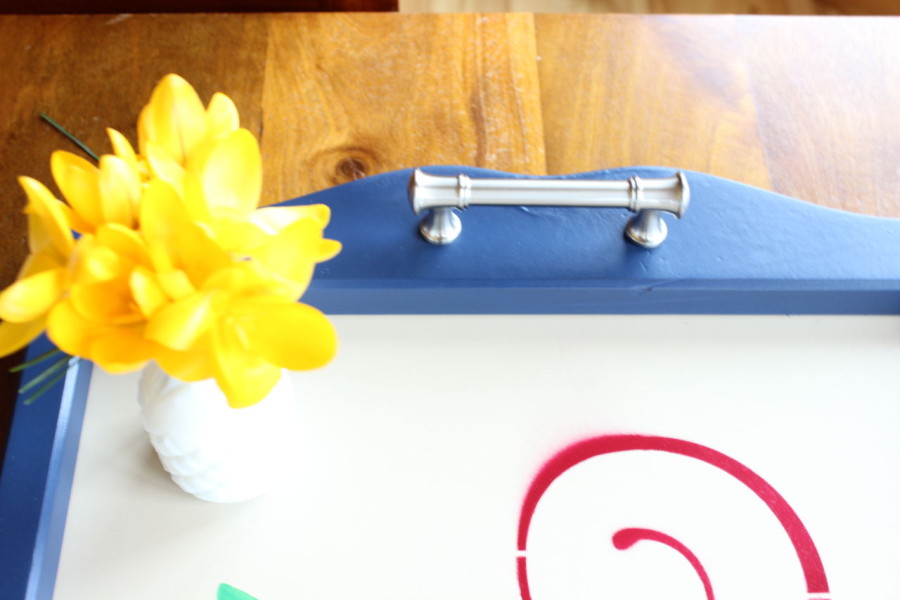
    Below is my finished project!  I am really happy with it!  Did you see the little accent colors I added?  The green for the leaves and the little pink dots.  I used some of the little acrylic paint that I had handy to paint those areas.

    Bloom Where You Are Planted tray

    I was getting so tired of the calendar frame.  Now, I have totally repurposed it.  I love it when I can recycle/upcycle something that I already have!

    Thanks for visiting my blog!  If you like easy recipes, gardening hints, and simple DIY's like this, please make sure you sign up to follow me.

    Hey, please do me a favor and pin my project!

    Collage of steps to stencil a tray that says Bloom where you are Planted.

    If you enjoy being creative and upcycling with spray paint, my favorite spray paint project includes hydrangeas!

    Creating Blue Hydrangeas for my living room (in my 100 year old home).

    More DIY

    • blue tinted mason jar containing daisies. Mason jar is clamped to a piece of white painted wood. This is a DIY mason jar wall vase.
      Wall-Mounted Mason Jar Vase
    • The flower frog in the top of the milkglass vase
      Easy DIY Flower Frog
    • Fireplace renovation - from ugly to awesome!
    • bucket full of red and green spray painted hydrangeas.
      How to paint hydrangeas

    Reader Interactions

    Comments

      Leave a Reply Cancel reply

      Your email address will not be published. Required fields are marked *

      Recipe Rating


      This site uses Akismet to reduce spam. Learn how your comment data is processed.

    1. Meredith

      March 21, 2016 at 12:48 pm

      Oh my gosh, this turned out so cute! I can't believe how different each bloggers' project is. I love your tray, with it's pretty silver handles!

      Reply
    2. bon bon @ Farmhouse 40

      March 21, 2016 at 8:59 am

      What a beautiful make over of the tray. Looks so pretty.

      Reply
    3. C.D. Loken

      March 21, 2016 at 8:04 am

      Oh how I LOVE a good upcyle, Susan! The pretty blue you chose for your tray is lovely, and the added door pulls is GENIUS!

      Reply
    4. Angela

      March 21, 2016 at 7:31 am

      Wow, you completely transformed that calendar frame. A tray like this is something I would get a lot of use from. The drawer pulls you chose really pop against that blue. Truly lovely!

      Reply
    5. mpbrittis@gmail.com

      March 21, 2016 at 6:41 am

      Love the tray and that color blue is one of my favorite colors... so pretty, great to meet you! Stop by Dream Create and inspire party tomorrow to link up the tray.
      Maria

      Reply
    6. Carole @ Garden Up Green

      March 21, 2016 at 6:31 am

      This is so fun - I'm thinking you should be served breakfast in bed on Mothers day with this tray. You're project is so bright and I love that it's upcycled. Perfect!

      Reply
    7. Patti Estep

      March 21, 2016 at 5:24 am

      Susan, Yours turned out great! Very patriotic and now you can serve the boys breakfast in bed. 😉
      I just bought and old wooden box at an antique store and was thinking of putting handles on it and making it a tray. After seeing your I think I'll definitely do just that. Thanks!

      Reply

    Primary Sidebar

    I'm Susan! I love sharing easy recipes, especially those that take less than 30 minutes and have less than 5 ingredients. I'm passionate about gardening and creating flower planters. My home is 100 years old and sometimes you will see it in my posts! It was a true fixer upper and I love it!

    More about me →

    Subscribe to Momcrieff

    Trending Articles...

    • An air fried sweet potato with a pat of butter melting in it and salt and pepper on it.
      Air Fryer Baked Sweet Potato
    • close up of three ingredient peanut butter cookies
      3 Ingredient Peanut Butter Cookies (Easy & Naturally Gluten-Free)
    • pasta bar ingredients including cooked spaghetti, spiral pasta, tomatos, cucumbers, steamed broccoli, hard boiled eggs, feta cheese, cut up rotisserie chicken, peppers.
      Easy Pasta Bar Ideas
    • 2 ingredient pumpkin muffins in muffin tin
      2 Ingredient Pumpkin Muffins
    • Air Fryer Rosemary Potatoes in a blue bowl with a sprig of rosemary beside the bowl.
      Easy Air Fryer Rosemary Potatoes
    • shortbread cookies on a white plate
      Simple and Delicious Shortbread Cookies
    • 3 ingredient chocolate banana muffins
      Banana chocolate muffins - 3 ingredients.
    • a serving of peach cobbler with a crispy topping and peaches showing. Served on a white plate.
      3 Ingredient Peach Cobbler
    • Pinterest
    • RSS
    • Twitter

    Footer

    ↑ back to top

    About

    • About Susan Moncrieff
    • Privacy Policy
    • Terms and Conditions
    • Contact

    Categories

    • Easy Recipes
    • Gardening
    • Flower Planters / Container Gardens

    Most Popular

    • 31+ Outdoor Planters
    • My Raised Garden Beds
    • Three Ingredient Peach Cobbler
    • Deconstructed cabbage rolls

    As an Amazon Associate, I earn from qualifying purchases.

    Copyright © 2025