The story of the kitchen remodel in my 100-year-old house.
This post is about a total kitchen remodel. Because of a flood, there really wasn't anything resembling a kitchen in the house when I purchased it. This house, built in 1923, was meant to be mine. I needed this house, and it needed me.
This is what the kitchen looked like when I bought the house.

But just so you know, this was a true diamond in the rough!

There had been a flood and the floors and cabinets had been removed so that there wouldn't be a mold issue. Where had they been moved to? Well, the dining room, of course! Along with the contents of the powder room and the little laundry room where the flood had originated.

Yes, this is the house I fell in love with. I wanted a house that needed cosmetic updates. This was a little more! I've never renovated a house but I didn't hesitate. I knew this was the house I wanted. In my mind, I already saw what it would be when it was completed. After some convincing, the seller agreed to sell me the house 'as is'. And, a bank gave me a portfolio mortgage so I could do the renovations this house so badly needed.
Below is a detailed slideshow showing the kitchen remodel. The beginning, the middle and the amazing end! Take a peek and let me know what you think.
I envisioned a much more open kitchen. Without the wall between the dining room and the kitchen. In spite of the toilet sitting in the middle of the dining room, I recognized the dining room as the most beautiful room in the house. This house needed a serious kitchen remodel - like HGTV style!
OK, I'm going to confess something. I saw the house before the flood. This was the original 1923 kitchen - before the flood! It was small, dark and had the oddest flow!
I knew this kitchen had potential!
That wall with the sink was just awful. It made the room dark and I just thought doing dishes there would be so depressing. The kitchen fridge even out into the doorway.
Once I closed on the house, the first thing I begged the contractor to do was to fix the hole in the kitchen floor.

It was just in the perfect spot that everyone stood on! It's funny, when I'm in the basement and I look up where the hole was, I still see the drywall tape on the wood used to repair the hole.
The kitchen remodel started a few days after closing. My contractors and I did most of our planning prior to the closing so that when the purchase was finalized, we could begin the demo right away. And, the day after closing, we ordered the cabinets! We ordered the cabinets I envisioned in that kitchen before I even bought the house.
So, the renovation had begun!
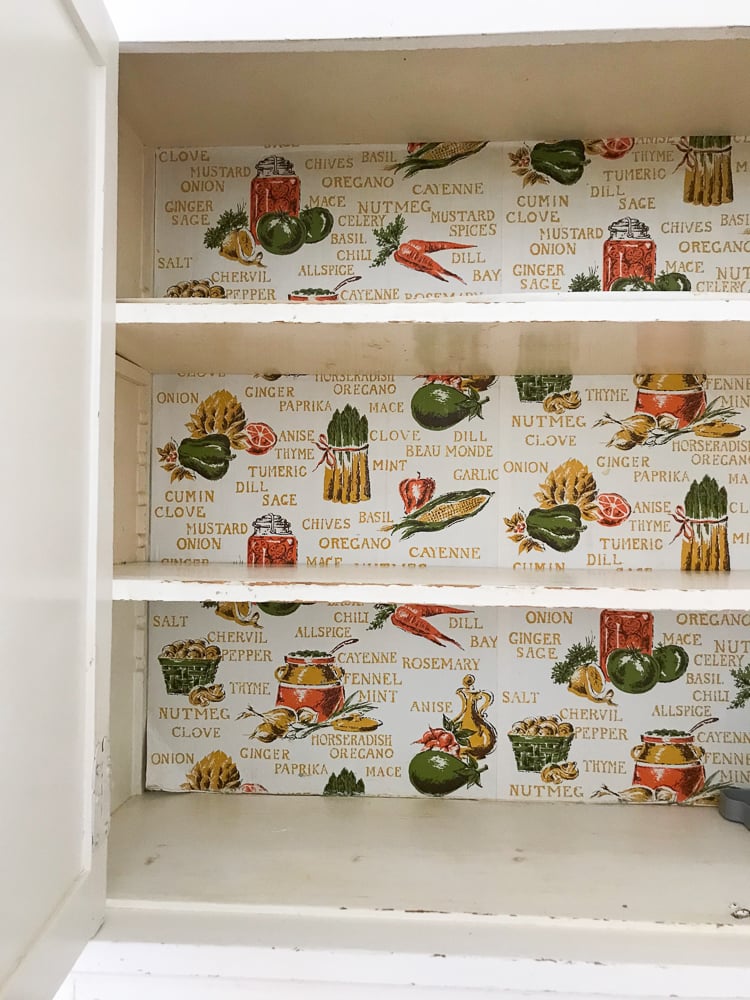
The rest of the kitchen cabinets and flooring were removed, along with the appliances. I did peak into the cabinets before they were taken down. What year do you think this was put in? The dumpster had arrived. The cabinets were all supposed to go into the dumpster. But, I couldn't do it. I asked that the cabinets all be put into the garage until I could either figure out what to do with them or decide once and for all to throw them out. You'll find out another day what happened to them!
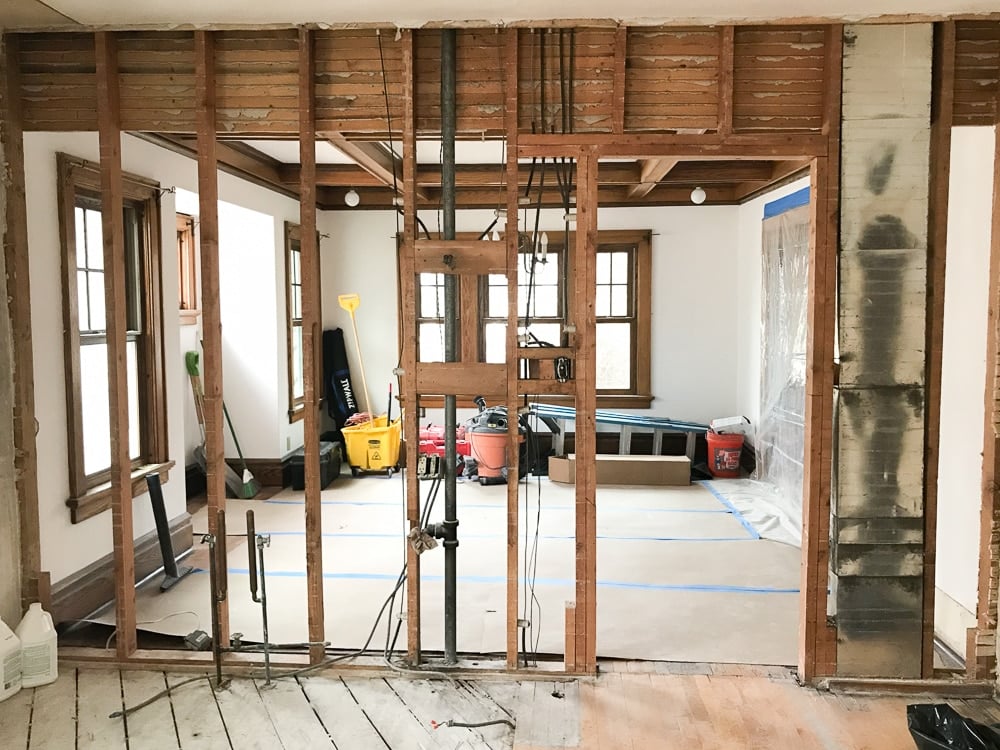
Then, the kitchen wall came down! Below is the wall looking from the kitchen to the dining room. Look how neat everyone was! And, my wooden floors in the dining room were well protected.
Remember how dark and closed off the original wall made the kitchen look?
Then the header went in and the rest of the studs were removed. The wall was gone!
The two rooms said hello to each other. And they were happy to finally see each other.
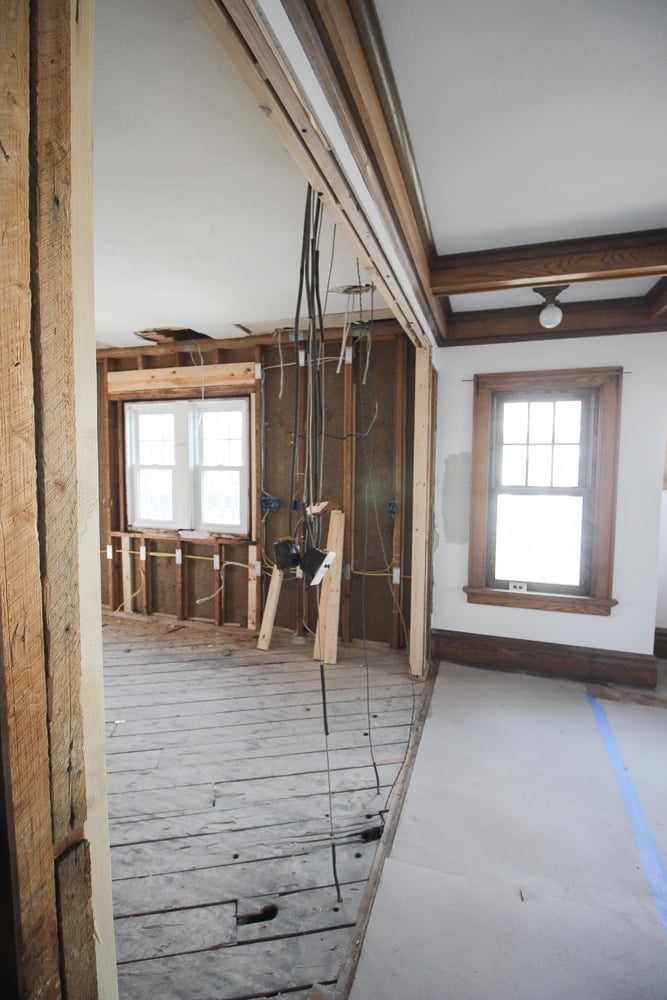
Did I mention the whole house had old aluminum knob and tube wiring? That all needed to go and the whole house had to be rewired. Let me repeat that. The whole house had to be rewired. Every switch, light fixture, and outlet. Plus a new service panel. It was a huge job! In the background, on the wall, you can see the new wiring was being roughed in.
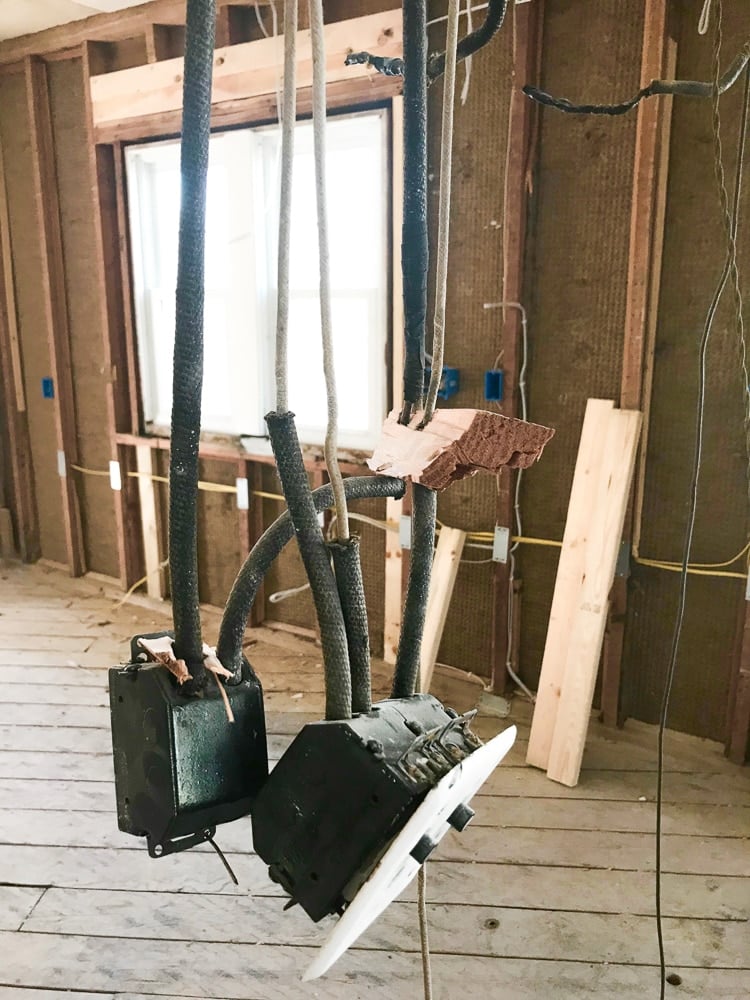
Weirdly, this picture (below) is one of my favorites of the demolition. Those were the functioning on and off switches for the lights!
The contractor and I discussed a big issue. There was no insulation in the walls. Because of the type of finish on the outside, there was a concern that blown in insulation would damage the exterior. So down the interior walls of the kitchen went. It made the wiring a lot easier!
Then insulation was added to any wall that was an exterior wall. It was one of those investments in this house that won't be seen. But, hopefully, will make a big difference in the utility bills.
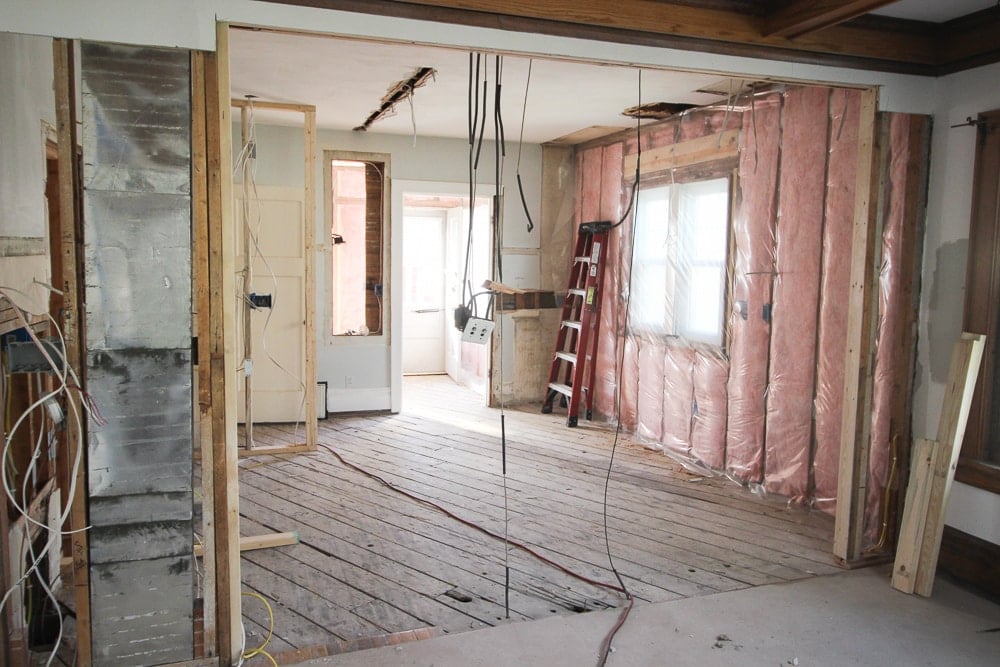
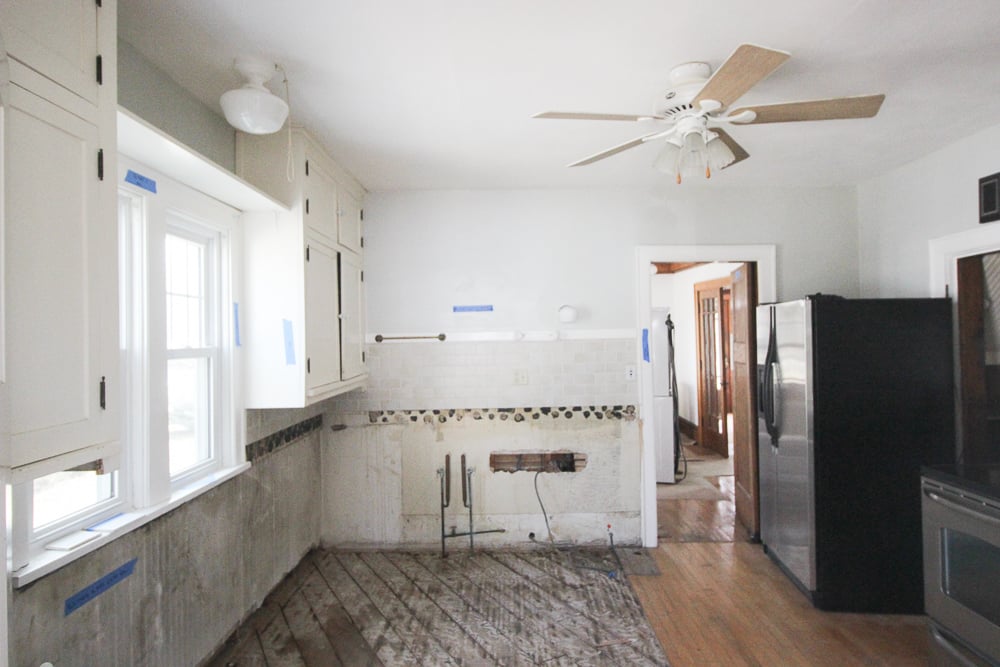
Do you see the big hole in the ceiling in the picture above? That was how the new wiring got to where the kitchen light was going. That hurt the first time I saw that. I was warned that there were going to be a bunch of holes because of the rewiring. But seeing the first few was tough.
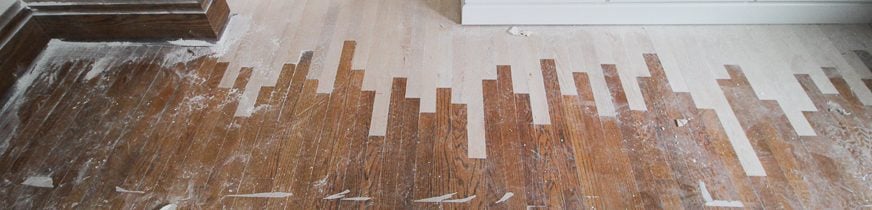
One of my biggest concerns was how to visually join the brand new kitchen and the old beautiful dining room. What we decided to do was to remove the balance of the maple floors and replace it with oak. The whole first floor except the kitchen had been done in oak. Mind you, every room seemed to be stained a different color. The plan was we'd strip the dining room floor (and every other room) and stain one color throughout the main floor rooms.
Here are the new floors feathered into the old floors.
Then drywall! It was so awesome to see the kitchen starting to get put back together. The drywall added such a clean look! I've seen drywall go up before. It is fast and it usually makes a huge visual difference. You can see the wires and holes for the new electrical wiring.
All the original old trim from around the doors and the windows was removed and stored in the garage. So were the original baseboards. Later in the process, the old trim was carefully reassembled and put back around the windows and doors.
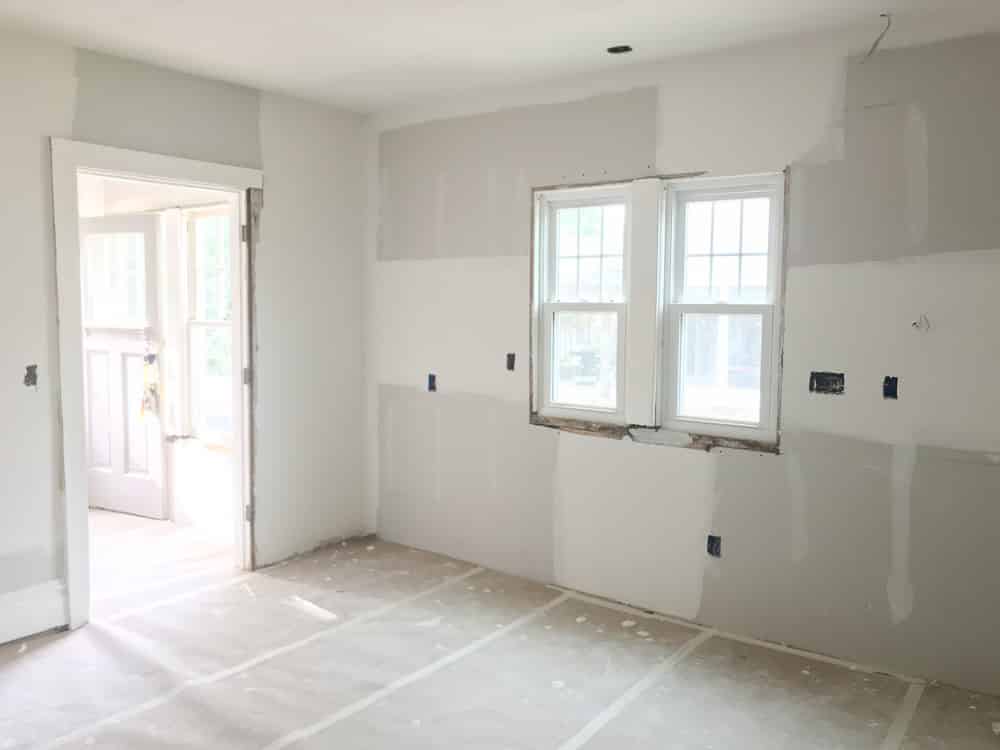
See how the new floor was protected? It's still unfinished underneath the paper. All the construction had to be completed prior to the floors being sanded and finished.
My cabinets arrived and were quickly installed!
I remember, prior to buying this house, standing in the torn apart kitchen trying to convince the seller not to put in a quick and inexpensive kitchen. I wanted to put in the kitchen and do it the way I wanted. At one point the seller was going to pay for the kitchen but I would be able to choose the finishes (but stay within the insurance settlement budget). In that kitchen, we finally came to an agreement to close without a kitchen.
One of the contractors at the meeting asked what I envisioned the kitchen looking like. That's when I told everyone I'd take out the wall between the kitchen and dining room, I'd move the kitchen sink to under the window, move the dishwasher beside the sink but I couldn't for the life of me figure out where to put the fridge : ).
I worked with an amazing interior designer who figured that out for me! And helped me with the practical items and some cosmetic choices of doing a major remodel. She is amazing and really figured out my style and tastes quickly. Plus, she always did her best to keep me in budget (not always successfully, but that's another story!
I digressed. My kitchen cabinets came and were installed! That was when my kitchen started looking like a kitchen again! That was huge progress in my kitchen remodel!
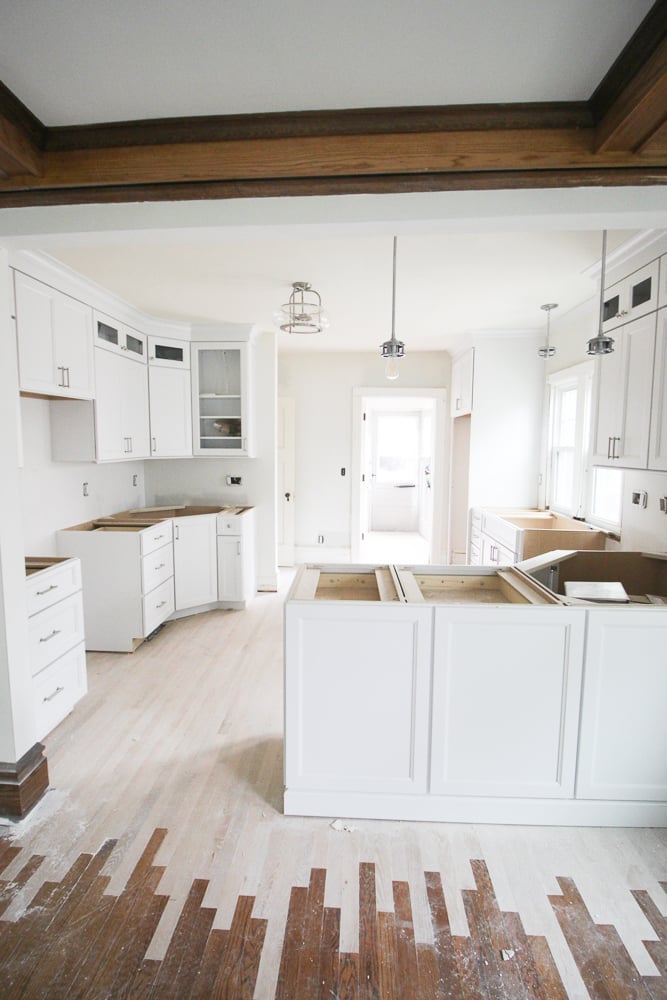
As you can see, the electrical was also moving forward and my new light fixtures were installed.
Once the cabinets were in, then the granite people could come and measure for the counters.
At one point, the contractor was going to put in a temporary sink and a small section of a temporary counter so I had a functioning kitchen.
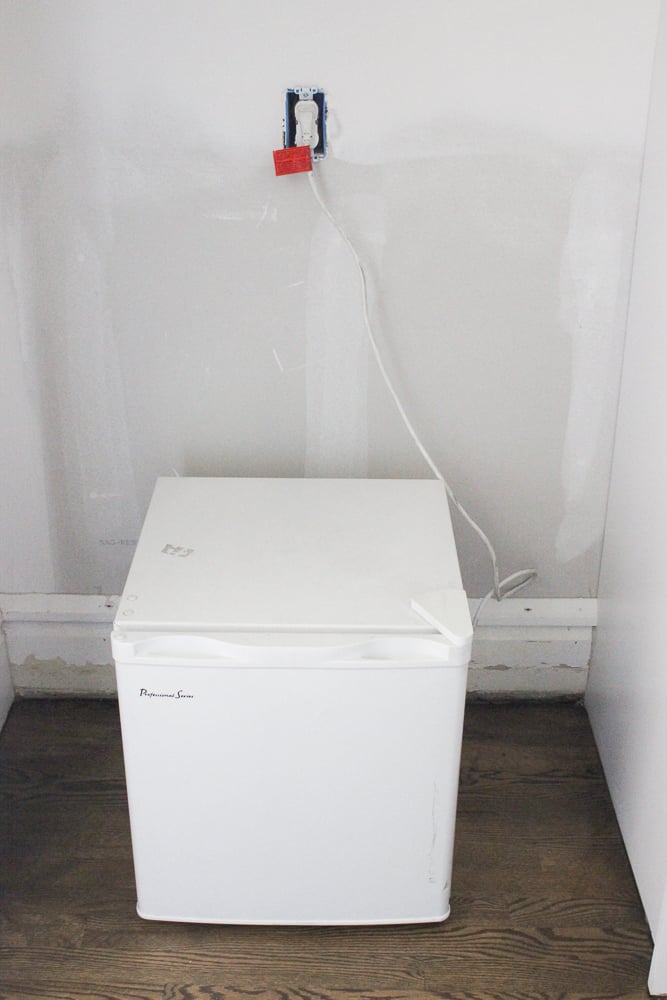
The counters came, but the appliances didn't.
I moved in any way because the apartment I was renting had been rented out and I couldn't extend my lease. I slept on an air mattress for over three weeks, but that's another story!
How did I survive without appliances? I posted these pictures on Facebook, much to the amusement of my friends and coworkers.
My fridge.
My oven.
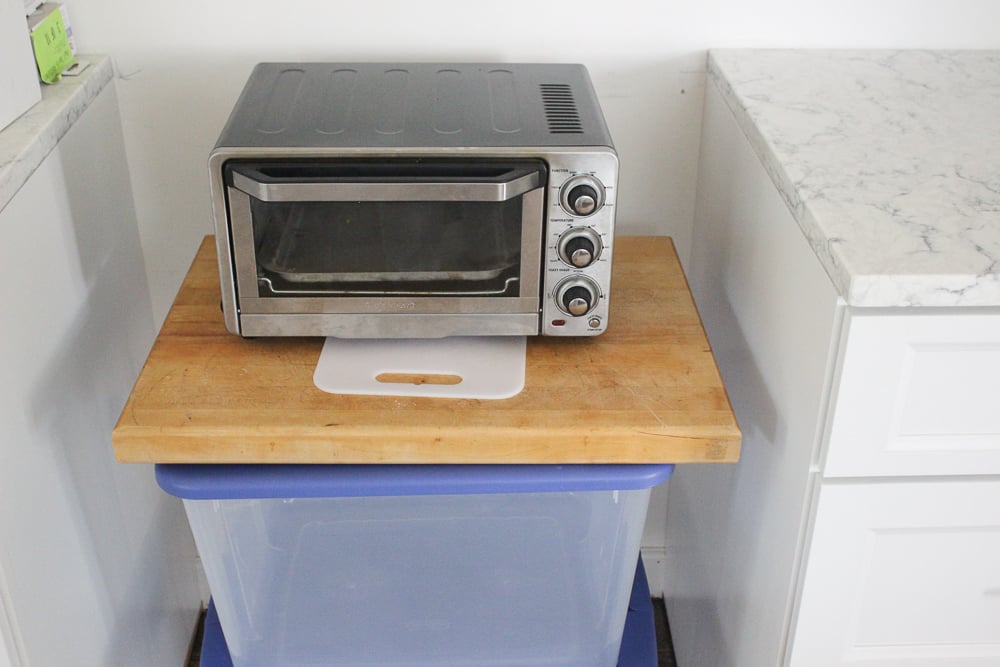
You do what you have to do! That really was a crappy fridge.
My floors were finished/refinished and I couldn't have been more pleased.
Here is how they look now, the old and the new match perfectly. Amazing since the original floors are 95 years old!
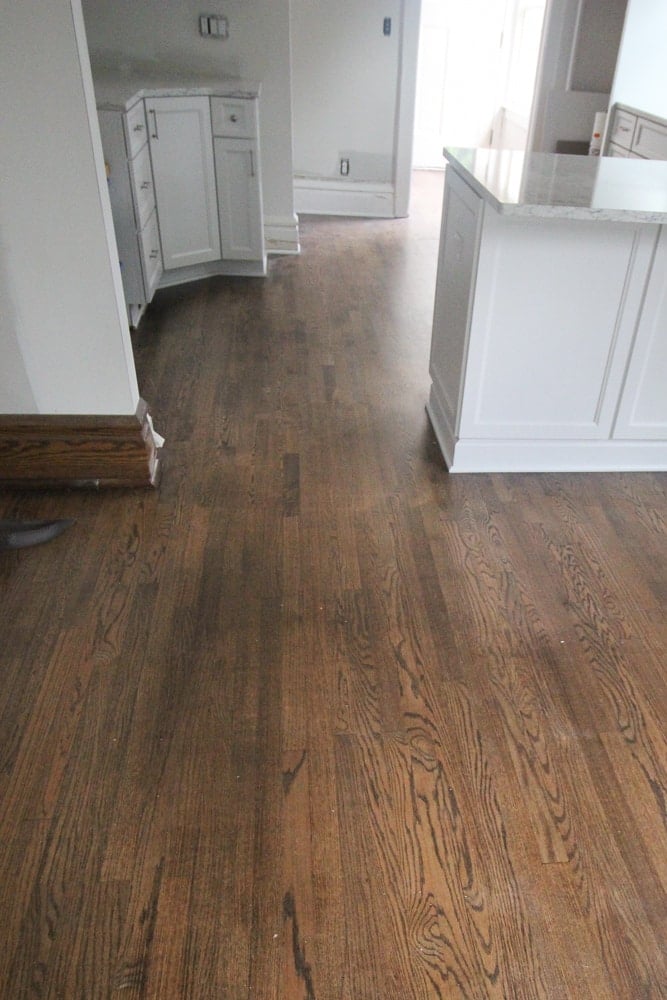
Love my floors!
And, I do enjoy my white tile backsplash. The tiles are a subway style but they are more textured and wavy than regular subway tiles.
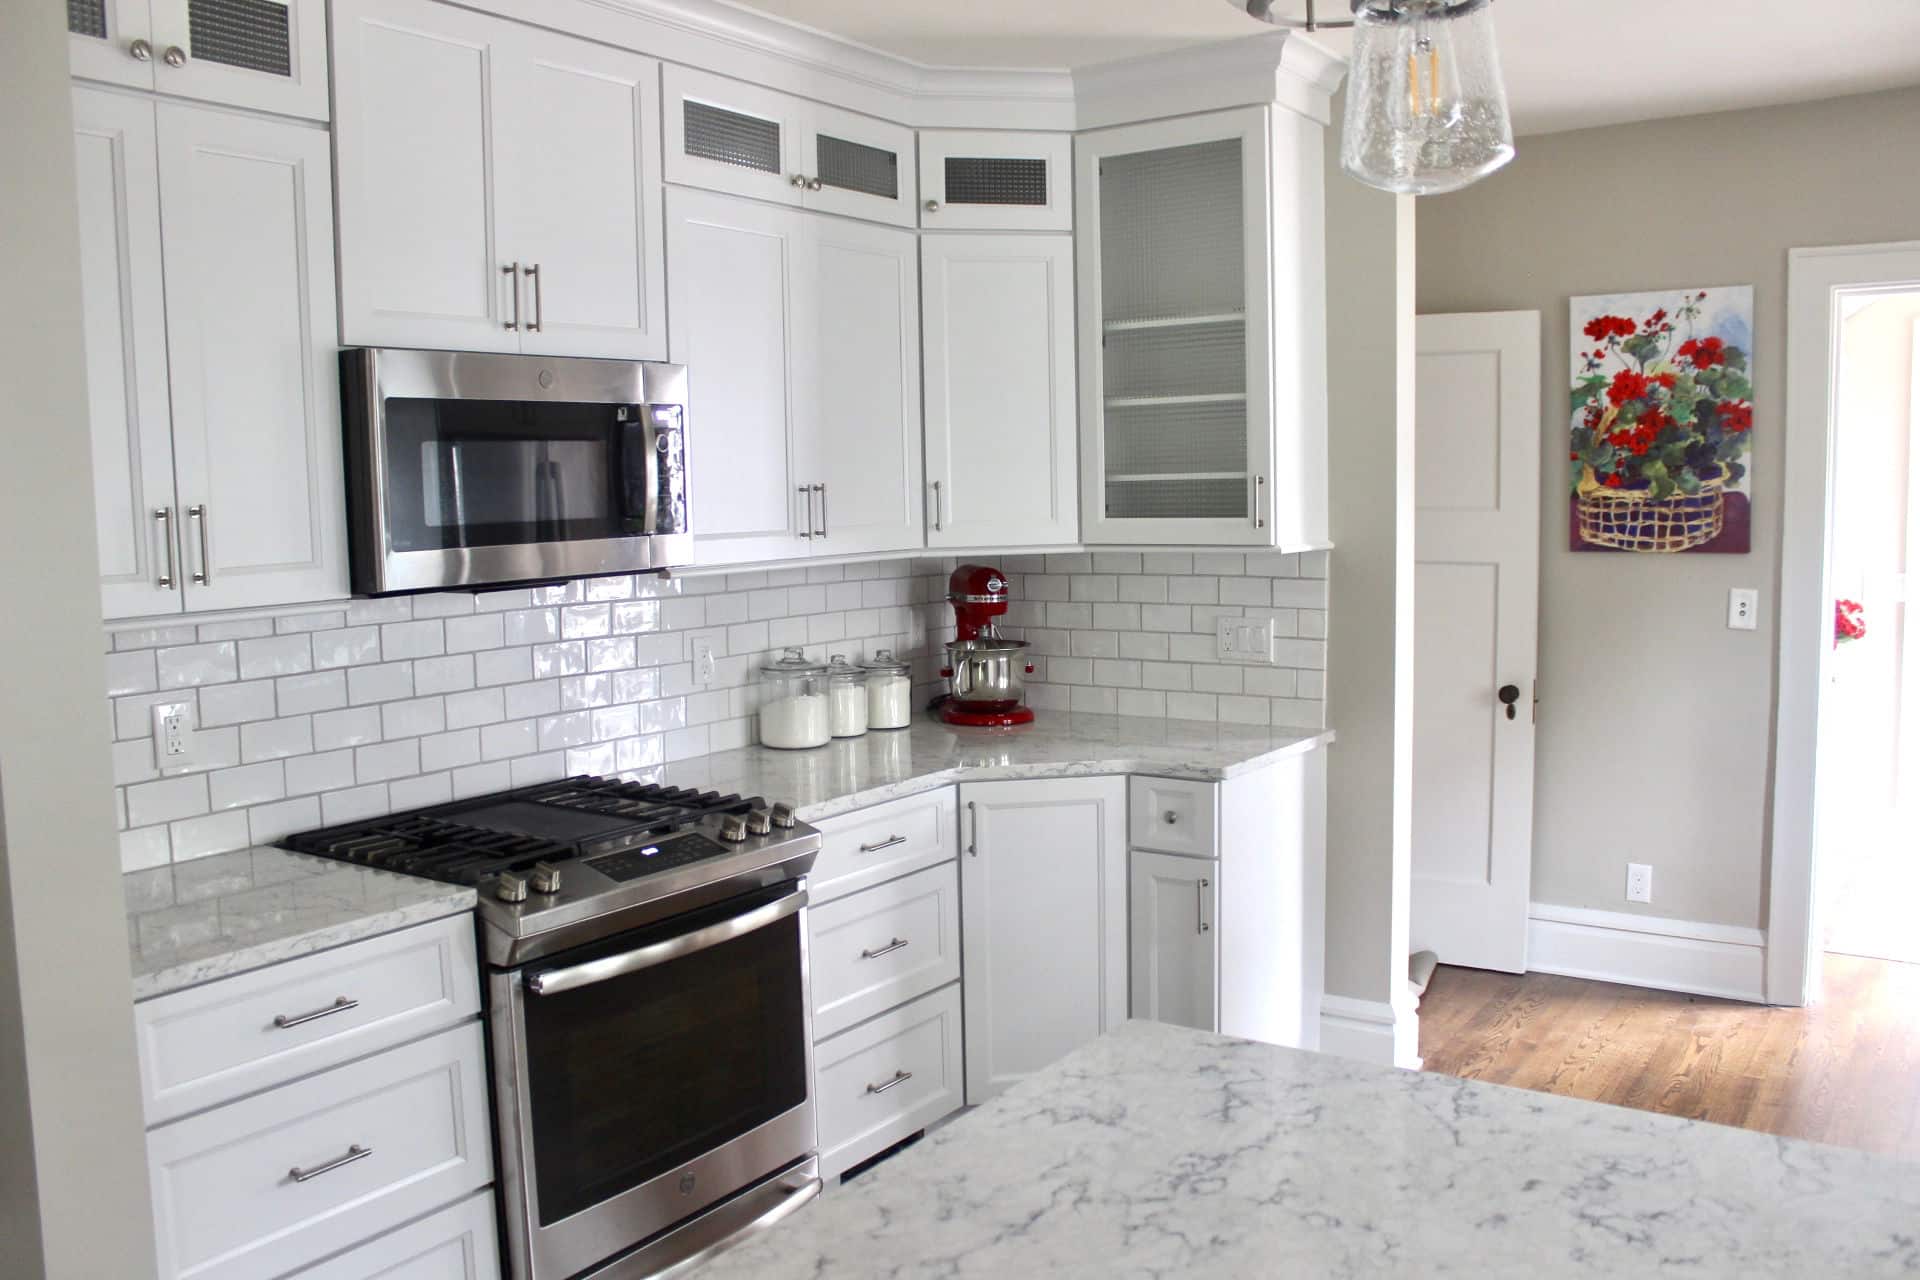
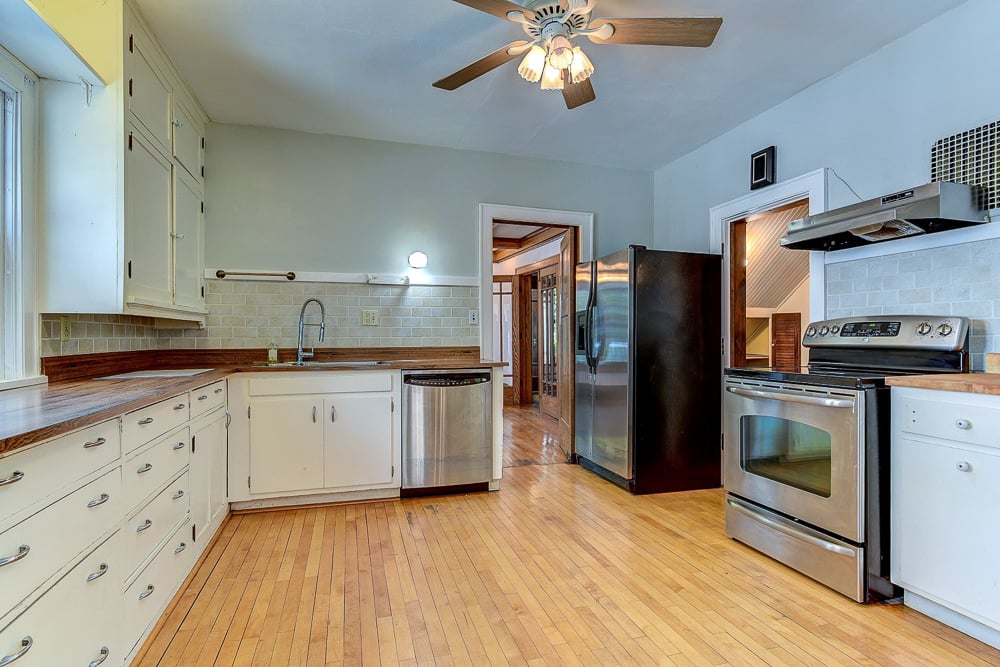
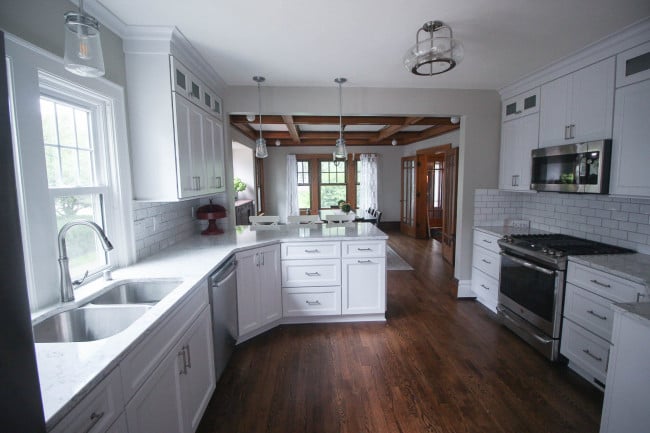
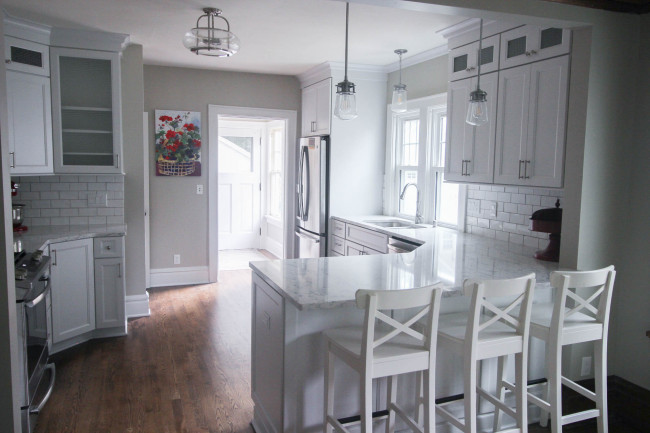
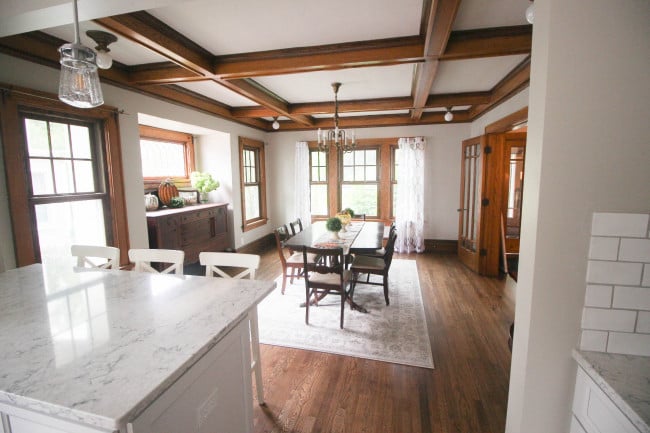
Let me show you my kitchen and dining room now. I am beyond thrilled with how everything turned out. The old and the new just look great together.
"Hey dining room," said the kitchen. "Where have you been all my life"
"Hiding behind a wall," said the dining room.
That wall is now gone. A beautiful new kitchen joins a 95-year-old dining room.
A look at the dining room. I'm so thankful to everyone who worked on my home. They demo'd, built new, rewired, replumbed and did all kinds of 'construction stuff' and respected and appreciated the beautiful character of this old house. Everything turned out beautifully!
I love this dining room table. A friend of mine found it for me and refinished it. It was a popular dining room set from the '20's.
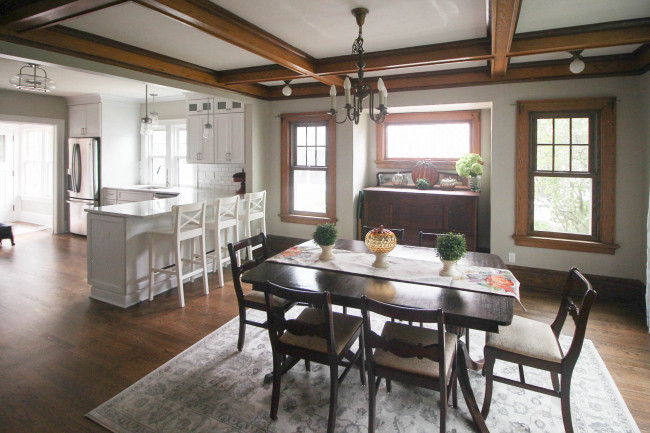
Do you see how the new kitchen and the old dining room are now just the best of friends? Totally inseparable and that's how they should be!
Every single time I come home and walk in the door, I appreciate how amazing this house is. It's been a journey to get here. I'm not just talking about a kitchen renovation. For more of a background to how I got to this point, click through to this post called New Beginnings - Me and My Fixer Upper.
Make sure to follow my blog to see more remodeling posts!
If you are a Pinterest user, Pin this Kitchen image to your Pinterest account!

I have more posts about my home to share with you! Love details of major renovations, take a peek at these posts!
My Easy and Inexpensive Fall Decor Tour
Me and My Fixer-Upper. What started it all.
The one thing I had the most questions about, was refinishing my floors. Here you go - an article devoted to how my oak and maple floors were repaired and refinished in my whole house!


Grandma's House DIY
Thanks for sharing with us I'll be featuring you this week when the next to Grandma's house we go link party starts!
Sharon Seibert
WOW, what an incredibly beautiful renovation!! I love the wooden beams on the ceiling, it just really enhances the beauty of the wood floors. You were a genius wanting to do the kitchen yourself because you know the old owner would NEVER have put this much effort into it just to get rid of it. BRAVO! BEAUTIFUL JOB!!
Susan Moncrieff
Thanks Sharon! Everything came together like I hoped. I enjoyed the process and the end result and was fortunate to have such great contractors!
Kate
More white cabinets. Again. The beautiful natural wood in the rest of the house makes this overly trendy, colorless kitchen all the more unfortunate and devoid of character. Removing the wall and bringing in more light that way was a great idea.
Susan Moncrieff
Actually, the original kitchen that was in my house had shaker style cabinets and they were all white! I replaced with something very similar. But, I'm not a fan of too much white either. My walls have color, my floors are a medium stained wood and, I love little spashes of red.
Lynn
Did they have trouble rewiring the fixtures in the wooden ceiling trim? I am having to rewire and have 2 sets of period lighting plus a ceiling fan that needs rewiring. Did they take the wood down?
momcrieff
Fortunately, in my dining room they did not have to take down the wooden ceiling trim. They were able to fish through the required wiring.
Julie
What color are the walls in your house? They look sort of Greige? Can you tell me the brand and name of color?
momcrieff
The walls in my kitchen and dining room are Benjamin Moore's Revere Pewter. But, I had Sherwin Williams match the color. After two years, I still love it! It looks great against my white kitchen cabinets and my wood trim in the dining room!
Anna
What a great story, thanks for sharing. We’re doing exactly same right now in our 1920s house. As I read your post I wondered, did you have to clean your kitchen from a lot of dust after floors were refinished? I’m so afraid of this crazy dust setting on my cabinets.
Linda
I just have to comment. I know this post has been out for awhile, however, I'm sure you receive these emails. I just want to tell you, you remind me of Cinderella. The shoe sure fits!!!! You did a marvelous job and, BTW, I love the blue living room. Go girl!
momcrieff
Thank you for the nice comment! You made my day. This house is so much work, but I love it. I like your Cinderella analogy. The shoe fits - perfectly!!
Laura Olson
I also live in Wisconsin and need to complete a kitchen remodel and take the wall down to open up the dining room. Love your story! Who was your interior designer?
Paul Wesly
The blog is really helpful. It is giving a lot of information to those who are looking for ways to renovate their kitchen from zero. The experience shared here is great and it is very useful. I will be looking forward to read more. This blog provides a full transformation of the kitchen that most of us need.
momcrieff
Thanks, Paul. It was a big job but I'm so happy with the results.
Carole West
Susan this looks amazing and you nailed it right down to the perfect wall color. It's so inviting and now you have this amazing place to cook and make new memories. That ceiling over the table is amazing. So Impressed, makes me almost want to reconsider living tiny.
momcrieff
Thank you so much for your kind comments! It was total luck that I found this place and it drew me in. We all need to listen to that inner voice!
Sally Schoepke Griffin
Fun! I really enjoyed your story and I really like the Kitchen/Dining!
Sally Griffin
Fun! I liked your story and really like the Ktichen dining
Lori van
I just love it! I wish you many happy years with your historic "new" home.
Anonymous
Wow - it looks amazing!! So happy it has all come together for you!
Cathy Brown
Wow. Amazing. You did it! So proud of you my friend!
Shelly H
Susan you did a great job. The rooms look beautiful. I wish you lots of happiness in your new home.
Anonymous
Well, blessings on you, girl! You have taken on a huge project and thrived.
Patti
Wow! It looks absolutely gorgeous! I know it was probably hard but well worth the wait and effort!!
Bonnnie Davis
This is your symphony. A masterful work of art nd function.
Beth
Your new kitchen is gorgeous!!! I'm sure you are so happy it is finally finished. Happy cooking!